
Factory - Call of Duty: Black Ops 3
 |  |
|---|---|
 |  |
Team Deathmatch (6 vs 6)
My thesis artifact is focused on designing Points of Contention and the supporting combat areas. Currently, my supporting design methods are different combinations of cover and elevation to provide balanced sightlines while using a standard 3 lane map approach with an emphasis on fluid lane changes.
A lot of the design was balanced to facilitate most play styles throughout the entire map. I wanted to avoid players feeling as if they could only play in designated locations.
This design is also being made with the idea of applicability for other popular game modes. The idea is to create a good Team Deathmatch map that also plays well on multiple other game modes. After my thesis defense, I plan on spending some time implementing functionality for other game modes.
Development Time: Dec 2017 - May 2018
SMG Gameplay Video
AR Gameplay Video
Shotgun Gameplay Video
Sniper Gameplay Video
Development Choices

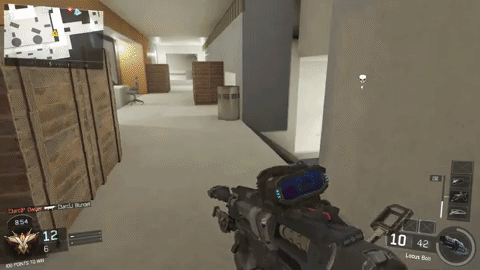
The design for the middle is to emphasize a powerful point of contention (gif on the right) while also giving the player the ability to push across the map but jumping from cover to cover. This design has two high points of contention (balconies) that watch over the middle of the map. They have the advantage of elevation with long sightlines. To keep ensure balanced design the high point of contention has the flankable entrances if they are looking out towards the mid of the map. There are entrances from both adjacent lanes and one entrance from behind the balcony. A secondary purpose is to keep the player moving instead of just staying in one position. Since Call of Duty is keen on having the player moving towards the action at all times, when balancing this position I wanted the player to keep the power of the location but to also realize that if they stay there too long they could be possibly targeted until they move.
Elevation: High and Low
Cover: Low-Moderate
Vulnerability: Easily Flankable
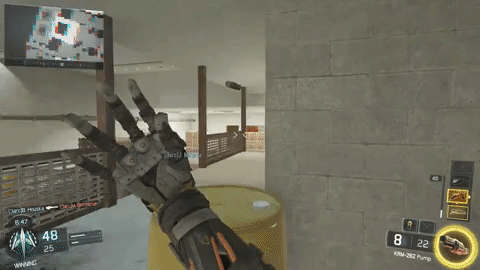

The design for the Vat Lane is to emphasize semi-powerful positions while also being balanced for close-quarter combat. In the gif you can see a player running up to gain an advantage on the ramp and another player moving towards a barrel for cover to watch over the Vats. This gif displays one intended way for countering players moving towards powerful positions. The player is flanking from a side entrance and catching the other players off guard. This space has a couple narrow long sightlines that are broken up by large full cover that close-quarter players will prefer.
Elevation: Medium and Low
Cover: Moderate
Vulnerability: Flankable
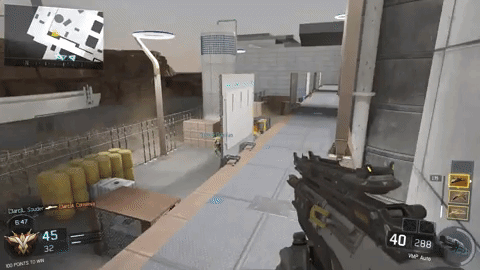

This outside lane was designed to facilitate most play styles. The flow and cover options down below are appealing to close quarter to medium ranged players whereas the top of the platform is appealing to medium to longer ranged players. The main drive behind this design is to encourage movement both across the map but also vertically. Players of varying skill levels have multiple opportunities to jump up on the platform is they want to have a more strategic advantage and people can jump down to catch other players off guard. The balancing aspect for the higher platform is being quite open through most of the journey. There are small pockets of full cover but if the player commits to watching over one side they are exposed from the opposite side. The full cover will cover you from the preferred side but leaves you exposed on many other angles.
Elevation: Mixed
Cover: Mixed
Vulnerability: Mixed